Wednesday, October 16, 2013

Back from Barber Vintage Weekend

Well, the 1st calendar deadline was met. I took the Cannonball bike to Barber, running!! My monthly calendar has some specific dated deadlines, one consisted of taking the complete motorcycle to Barber Vintage Festival and ride it on the race track after we completed the Century Lap. What an Awesome experience of riding a motorcycle on the Barber Motorsports Race Track!

Saturday, we had Tech Inspection on the paddock for all of the Century Lap riders. We have a team of club members who inspect the 100 year old machines. My riders this year were Dale & Matt Walksler, Paul Ousey, Ronnie Cox, John Menefee, Joe Gardella, Kevin Grubb, Jack wells, & Dan Fluegeman . This years start was the finest one we have ever had in the nine years.
 
Then, our checkered flag finish was the highlight on the event! John Menefee was riding a 1913 Indian twin and in the lead. Dale Walksler was right behind him. I raised the checkered flag as they were coming to the finish line. In my mind, I just knew John was going to win. In the last 8 to 10 feet, Dale raised up on his 1912 Harley twin and just flew past John and won by 1/2 tire!!! When you look at the finish line picture, there is NO way anyone could plan this. It was the most awesome finish ever!
 2013 Barber Race of the Century Riders

1st – Twin Dale - Walksler - 1912 Indian Twin - #1
2nd - Twin John - Menefee – 1913 Indian Twin - #3
1st – Single - Kevin Grubb - 1913 Rudge Multi - #7...

2nd – Single - Paul Ousey – 1913 Harley Single - #11
Joe Gardella - 1913 Harley Twin - #2
Dan Fluegeman – 1913 Excelisor - #10
Jack Wells – Abington King – No Jersey
Matt Walksler - 1913 Harley Twin - #4 - DNF
Ronnie Cox – 1913 Harley Single - #8 - DNF
 
 
After the Century Lap, the Cannonball Motorcycles got to ride around the track 2 laps. I already had my 1919 Harley on the paddock, ready to go. We had a great turn out of past and future Cannonball riders.
 
Cannonball Riders – Past and 2014 Riders

Paul Ousey – 1925 Harley JD
Buzz Kanter – 1929 Harley JDH
Jim Petty – 1927 Indian Chief
Joe Gardella – 1913 Harley
Buck Carson – 1929 BSA
Jack Wells - BMW
John Landstrom - BMW
Mike Carson – 1924 Harley J
David Lloyd – 1919 Harley J
Steve Simpson – 1928 Harley JD
Jon Neuman – 1926 Harley J

Paul Ousey, Buzz Kanter, Jim Petty and Joe Gardella are 4 of the only 10 people who are competing in the 2014 and have ridden in both previous Cannonball Runs.

Here is a movie clip of the Cannonball Motorcycles  
 

Sunday, September 8, 2013

Time is Sneaking Up - Less Than 365 Days!

I am positive that I can't be the only rider who had the thoughts on this past Thursday, September 5, 2013, "In one year from today, we will be in Daytona Beach, Fl about to take off on a 4100 mile journey". Of the 100 riders, 60 of them are experienced Cannonballers. 40 of us are rookies.1st timers to compete in this awesome adventure. I remember getting accepted as a rider with Carson Classic Motors (CCM) this past May. We had 1 year and 4 months until Showtime, now we are less than 365 days. Time is Sneaking UP on us!
As I write this entry on September 8, 2013 - Next year on this day, we will be 3 days into the 2014 Cannonball Run, pulling out of Chattanooga TN, heading to Clarksville, Tn.

My Cannonball notebook, known as my "Blue Book" mentioned several times in this blog is getting more and more notes and updates. Several weeks ago, I misplaced this book and began to have panic attacks about what happen to it. Then, I got a call from a friend stating he had found it in his shop, just where I had left it weeks earlier. Maybe I should make a copy of the book every couple of months. I did write a note inside the cover to please return this book if found. With my return address and contact information.  There are 12 calendar pages in the back of the book that serve as the final 12 month count-down months. It has dated detail check points and goals listed. Some of those goals listed are:

On the 1st of every month, I will document and write in my current weight.
On the 30th of each month, I will write in total bicycle miles ridden
October 10, 2013 - Motorcycle should be together, running and on the trailer to Barber Vintage Weekend.
December 31, 2013 - 1,000 miles on Cannonball Motorcycle - Engine & Transmission #1
March 1, 2014 - Spare Engine and Transmission complete and installed.
May 31, 2014 - 1000 miles on Cannonball Motorcycle - Engine & Transmission #2.
June 30, 2014 - Original Engine and Transmission #1 installed.
September 5, 2014 - Be in Daytona Beach Fl - Ready to GO

Stumbled upon a very cool video series on Netflix this past weekend. It was called "Long Way Round". 2 fellows, Ewan McGregor and Charley Boorman ride BMW motorcycles from London to New York (19,000 miles) in 115 days - It was a 7 part mini-series. This documentary makes the Cannonball Run look like a ride through the park - Look it up on Netflix, or search the internet for the complete video series. It is worth watching.

Still working on many items in the shop - Here is a little video on small clips, combined into one video of several things doing into this motorcycle.


After seeing the actual route of the 2014 Cannonball Run, brakes have become my greatest concern. Several of the western days are going to see some amazing altitudes. Climbing and descending. I was very happy with the choice of adding a VL front drum brake, but now studying a better rear brake setup. David Kleptz ran in the original 2010 Cannonball and his 1915 performed perfectly. I contacted him months ago and he has been super helpful and sharing a great deal of information and advice. When we last discussed rear brake options, he recommended I used a better rear brake than the original 1919 band shoe over a drum setup. He shipped me a rear brake drum he designed to fit on his 1915 Harley J model rear hub. He also allowed me to copy the design to use on my J model. It requires a Panhead front brake drum and a fabricated backing plate. You mill out the brake drum center and weld in a cogged spine from a sprocket. This setup offers a great stable rear brake and maintains a vintage original look - Thanks David Kleptz for all of your advice and coaching - I would never be where I am today in this project without your help!


Until next time..................

Friday, August 23, 2013

Questions about Stage 12 - Springville UT to Elko NV

In all of my studying the route of the Cannonball 2014 Antique Motorcycle Run - from Daytona Fl to Tacoma Wa. The official Cannonball people have only released the cities and stops for the route. My map on this blog is only my guessing at the proposed route. Some of the stops are easily routed with Google maps. You can take off the "Avoid Highways" and it will route you without using major highways.Stage 12 really has me guessing - Springville Ut. to Elko, NV is connected by a direct major Highway 80 and the distance is 277 miles. If you check "avoid highways", then you are re-routed down US 50 to US 93 and up into Elko, NV. That route is listed as 443 miles!!! What a day that would be. Many people have seen this entry on my blog and question me if it is correct. No one has stated this is the route we will be taking - only my playing with Google Maps.

I once did the Natchez Trace with some friends on Late Model Harley's. We pulled onto the Natchez Trace at Nashville TN at 7 am and rolled to Natchez Ms that evening at dark. It was 440 miles. We did not speed much over the speed limit, however, we also did not play around with stopping and site seeing. Our goal was to run the entire Trace in one day. It was a September day after daylight savings time.

Lonnie Isam's announcement also has noted that the ride will pass by the Salt Flats in Utah. This would be the most logical stage of the run to stop at the Bonneville Salt Flats. So, with that information, the lower US 50 to US 93 seems incorrect. We will have to wait and see what the Cannonball officials tell us when they release the official route. We will keep watching! Hope I didn't scare too many people!

Wednesday, August 21, 2013

Better Map Details


Better Details of the 2014 Route
Cannonball Antique Motorcycle Run
September 5 - 21, 2014


Monday, August 19, 2013

Let's See the Map!!

 
Lonnie released a rough draft of the Route for the 2014 Cannonball Antique Motorcycle Run.
I plotted pinpoints on the known cities and areas he listed. This is not the exact route, but very close.


This map is displayed in my office so that the realization of the ride stays right near me

Wednesday, August 14, 2013

A Change in Lifestyle

So much attention has been focused on getting this motorcycle and parts list on track for a 4100 mile ride. With almost a completely restored 1919 Harley Davidson ready to start breaking in, now I have a spare motor, transmission, generator, carburetor, wheels and many other parts ready to put into action if needed. My detailed logbook, known as the "Blue Book" has many chapter sections of notes, to-do list, and thoughts. Every time I think of anything related to completing this journey, it goes into this book, under the proper section. There is also a section listed as "Fitness" in this blue book. This chapter is intended to monitor the path I need to follow that will help my body get ready for "A Trip of a Lifetime" It's one thing to prepare and restore some 94 year old metal and iron, but a totally different thing to get a 55 year old person physically and mentally ready to endure the elements encountered on a ride like this.
For the last month, I have been getting up at 4:30 to 5:00 am and walking my neighborhood. Covering about 2 or 3 miles a day. My dogs have really been enjoying it, because I take one of them each day with me. The plan was to get a month or two of physical walking under my belt and then advance to a more physical activity after that. Many years ago, I was deeply involved in weight and strength training. That also included running 3 to 5 miles outdoors and on a treadmill. Considering my age, I decided to look into bicycling as a new form of physical training.


The story of finding this Fuji Cross Town 26 inch road bike is really a neat unfolding series of events. While chasing parts for the Harley Cannonball motorcycle, I also began to watch Craigslist, and local sources for a used road bicycle to ride. I had arranged for a local club member to lace and true my new and spare motorcycle wheels. Everyone knows it is a unique art to lacing and truing wheels. I had several new rims, hubs, tires and spoke kits. This included the wheels for the Cannonball bike, a spare set of wheels for that event and even another set of custom rims, intended for a future 1934 Harley Davidson VLD Bobber. The job I needed of lacing and truing wheels was a big job, consisting of 6 complete wheel rebuilds. It seem to be a larger task than my local club member was willing to tackle. He backed out of the job on me, leaving me with "what to do now"!

My friend, Johnny Whitsett informed me about an older fellow named Henry, who owned a bicycle shop in Southaven Mississippi. Johnny said he was an expert at lacing and truing wheels. Henry has been in the bicycle business for nearly 60 years. I called him and described the project. He told me to bring a couple of the wheels down to the shop, drop them off and let him look at them.

A week went by and Henry called me one morning a said, He was worried about scratching the powder coating on the rims when he was lacing the spokes. Then he asked me the Big question, "if you want to come down to the shop and help me, I think we can do this together". That was all I needed! A chance to see lacing and truing with my own eyes. ( Many of my club members had already tried to get me to do the work myself - Yea, Right!!) On Friday, I went to Henry's bicycle shop and he invited me in the back to the work bench and explained how to get started. He even had me masking tape the rims to help against scratches.


Henry showed me the very detailed art of lacing the inner and outer spokes. After a few minutes, it clicked in my brain and understood how to lace the spokes. Lacing is one thing, truing the wheel is another thing! After a few minutes, we had both wheels laced and snugged up tight. I actually laced the 2nd wheel with Henry coaching me. While Henry and I were lacing wheels, I also told him about my quest for a road bicycle to help me get in shape for this upcoming event. I inquired about any used bikes he might have around the shop. He pointed to a few rough old bikes in the corner of the shop. Nothing I would want to actually ride. That was about all he said concerning bicycles.


After lacing these 2 rims at Henry's shop, I went home pretty excited about this new procedure I just learned. I pulled the red custom rims and hubs up on my work bench and started to lace these two rims. Henry told me if I wanted to lace those wheels at home, I could bring them over to his shop on Saturday and leave those with the ones we already laced. He would true all 4 of the wheels the next week.
About 1 hour later in my shop, Here were the results:


So, Saturday, I go back to Henry's shop, with the red wheels to let him inspect my lacing skills he had taught me the day before. He looked the wheels over and, "boy, you did good". As I was about to leave, Henry said, "David, I want you to take that bicycle right there out in the parking lot and ride it around for a few minutes and tell me what you think about it". He pointed to a bike setting right next to the door, ready to ride.

This was the Fuji Lightweight 26 inch frame road bike with 24 speed Shimano trigger shift levers, front shocks with anti-dive, and a Gel padded seat. The bike was Awesome!


As I was driving back home in my Honda Element with a brand new Fuji road bike tucked in the back cargo area, two things occurred to me:

There is a reason Henry has survived 60 years in the personal family bicycle business. He wasn't a pushy salesman, he was actually quit clever. He listened to me when I described my plan to find a used bike, and actually had exactly what I was looking for sitting right in front of me when I came back to the shop. I already knew what a new bike was going to cost if I went down that road. My original plan was going to be finding the guy who bought a brand new bike, rode it for a year and hung it on the wall. Enter David Lloyd to sweep it up for half price!!

Number 2 - Henry taught me something I will carry with me for the rest of my life. How to spoke a 4 cross pattern wheel. That alone was worth spending my money with Henry and his small bicycle shop.

So, for the last few days, I have been riding my new bike, putting miles on it, continuing down the path of preparation to Ride in the 2014 Cannonball Antique Motorcycle Run next September. 4100 miles - Daytona Fl to Tacoma, WA in 16 days. - More to Come - David

Friday, July 26, 2013

Timken Tapered Neck Bearing conversion for Harley J models

I have been asked by several people to expand in more detail the work required to convert a J model Harley roller bearing neck to the tapered Timken bearings we installed on my Cannonball Motorcycle. I would be more than happy to share the details we experienced while machining these cups. Plus, I will include some detail photos of the project.


As you will see, the factory cups for the fork neck on early J model Harleys (1911 - 1921) held 40 - 1/4 inch (.250) roller balls. 20 balls in the upper cup and 20 balls in the lower cup. These balls get wear and develop flat spots on the rollers, which cause a sloppy front end, speed wobble and just stiff turning. For the Cannonball project bike, we decided to install Timken tapered roller bearing in the neck of this 1919 Harley. This conversion is quite common on motorcycles with the ball bearing necks, but no one we found offered the proper cups to fit an early J Harley.


After knocking out the original cups with a brass punch and hammer, inspect the neck and clean all edges.
The factory measurement for the neck height is 5 1/4 or 5.258. At this point, we also decided to install a complete VL I-beam front-end on this bike. All components will exchange. This also allows me to install a front drum factory VL brake setup without any modifications.


Here are some detail shots of the actual bearing cups we machined to hold the races and tapered timken bearings

Timken Race Part # 15520 - sug retail $8.43
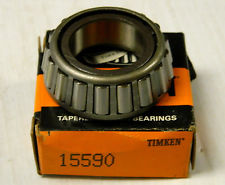
Timken Tapered cone bearing Part # 15590 - sug retail $16.28


Here are the measurements for the race holders - Top and bottom cups are exactly the same.


Use a threaded rod with large washers to squeeze the cups into the neck.


Here is the VL fork installed in the J Harley neck with tapered neck bearings.


Hope this is helpful. I have not ridden the bike with this frontend yet, but plan to have it back together in the next few weeks, so we can start to test and adjust it as we continue to press forward on the Coast to Coast Run in 2014 - Thanks

Tuesday, July 16, 2013

Moving Forward and Completing Phase #1


We actually got to escape to our river cabin up in the Arkansas Ozark Mountains on the Little Red River for the 4th of July holiday. Those trips usually turn out to be tons of work every time we go there, but it is so relaxing and enjoyable, even though its hard work! Got to Trout fish a few days, and even went fishing one early morning with one of my river neighbors, Jason.


After we returned home, the collection of boxes delivered to the shop seemed like Christmas morning! After opening all the boxes, sorting all the different parts according to its portion of the project, it seems I may now have all the parts needed to complete phase 1 in my action plan to ride in this 2014 Cannonball Run.


Phase 1 consisted of several key achievements:
 
(1) Getting the original motor #10154 back together with the new .020 cylinders, Venolia pistons, off-set rocker arms, over sized push-rods and new valves. This motor is the engine that will run the complete event. (hopefully)
 
(2) Acquire all the missing parts to complete "back-up motor" #13728 - This was quite a parts chase, but now I have everything needed to assemble the spare engine. Many people in the antique motorcycle world have helped me chase down all the special parts needed to complete this step.
 
(3) Roundup all needed parts to complete the 30's VL front end - I already had most of the hard parts here, but finally got all the hardware and pieces needed to install a complete VL front end on the motorcycle. We machined frame neck cups to add Timken tapered bearings, and put sealed bearings in the rear JD hub with stock VL brakes.
 
(4) Build new complete wheels and a spare set. This was a costly expense. New rims, spokes, tires, tubes and rim bands! Times 4!! They are ready to be laced. 2 VL 19inch wheels and 2 19inch JD rear wheels.
 
 
Setting up the JD rear hub in the lathe to cut the
roller ball surface out to install sealed bearings

 
How about that "China" word on my bearing?
Hope that doesn't come back to haunt me!!!

 
All my new wheel sets ready to be laced!


The 30's VL I-beam front end with Timken tapered roller bearings. Also parkerized all the springs and hardware. About to have the complete rolling chassis ready for a 3500 mile trip!!
 
 
******************************************************************
Now, for some Trivial Fun!!
 
My 1919 Harley Davidson serial number is 19A10154
and my perfect set of spare cases are L19A13728
 

There are many different resources claiming Harley Davidson motorcycle productions per year – It really depends on which book your are reading, but I found a couple of sources that stated very similar numbers. One of those sources was the numbered Harley Davidson museum limited edition book and I have another book about Harley’s that stated the same numbers for 1919.
 
W model (opposed) – 753 units
F model (magneto) – 5064 units
J model (electric) – 9941 units
FS model (US Gov Mil & Side car) – 7521 units

Total production units = 23,279

 
I also confirmed the total number of 23,290 with other references –without the actual different model breakdowns

So check this out:

Engine #1 – 19A10154
Engine #2 – L19A13728

These 2 engines are 3,574 digits apart –


If you divide 23,279 into 365 days, you get 64 engines per day
(this probably didn’t happen working 365 days per year)
5 working days per week =260 days in a year seems more realistic.

So, 23,279 units divided by 260 working days = 90 engines per day
 
90 engines per day, would put my 2 Harley Engines about 40 days apart –
Remember, this happen 94 years ago 

FYI – Just another note: 

1918 total production was 27,250 units & 1920 total production was 28,189 units


Thursday, June 27, 2013

Parts Chase

What a past week! I have been chasing and gathering parts like a Fox squirrel getting ready for winter. Last year at the Barber Vintage Antique Motorcycle weekend, I was surprised to find some of my buddies had planned a little roasting for me at the Saturday night dinner. Ed Dacus, Shane Dorton, Bob Collie and a few others convinced the musical legend, "Rusty McFarland" to rewrite the words to a Johnny Cash song named, "One Piece at a Time" into a story of the trials and tribulations of building a 1919 Harley Davidson, One piece at a time. . It was well written and perfectly described the past couple of years with this project. Someone recorded the presentation and put it on YouTube. (How does everything today end up on YouTube?) "One Piece at a Time" Written and performed by Rusty McFarland

All of my new wheels are at the Powercoat shop, Spoke kits are on the way, engine pistons and cylinders are getting fitted at Dale Spooner's Motion Machine Shop in Virginia. Motion Machine Shop - Harley JD Boring Cylinders.

Parts have been arriving everyday, meeting new folk’s everyday. There are many guys who are helping and coaching me through the steps to make this journey a success.

Jon Neuman, Dale Walksler, Tom Fesser, Michael Breeding, David Morrill, George Hood, Chuck Vogel and Calvin Burnett are just a few of the many people helping supply the parts chasing list.

Regarding Riding Gear, the collection of goodies include an Arlen Ness 3 layer all weather lightweight riding jacket. Decided to go with the Shoei Neotec modular helmet with the Uclear Bluetooth wireless communication system.


Mocking-up the VL front end for the JD frame. Installed Timken Tapered roller bearings in the frame neck
Have received all springer bushings and springs.


Gathering up all of my Harley VL wheel hubs for cleaning and lacing to the rims, when the spoke kits arrive.


Michael Breeding's Jiffy Kick stand is a must! After a full day of riding, trying to park a JD Harley on the rear stand will prove to be a total disaster to a tried rider. Money well spent!!!